
## Redux-Saga 란
React는 대표적인 SPA(Single Page Application)을 위한 라이브러리 이다. 유명한 MVC 패턴에서 V(View)만을 담당하기 때문에 다른 SPA 프레임워크인 앵귤러나 뷰와는 달리 라이브러리의 특징을 가지며 그렇다 보니 앵귤러나 뷰가 구축하고 있는 다른 개발 환경을 직접 구축해야 한다는 장점이자 단점이 존재한다. React는 앱이 가벼울 경우 State를 이용하여 충분히 데이터를 핸들링 할 수 있지만, 앱이 점점 복잡해 질 수록 데이터 관리를 별도로 해야하는 요구사항이 생겼으며 이로 인해 생긴 라이브러리들이 Redux, MobX등이 있다. 둘 다 훌룡한 라이브러리 이지만 Redux를 선택해서 데이터 관리를 시작해 보기로 하자. Store에 데이터 들을 저장하고 액션을 발행해서 집어넣고... 그럭 저럭 잘 동작하고 있지만 앱이 조금 더 많이 복잡해지면서 비동기 처리를 해야 하는 코드가 늘어나 버렸다. React는 View를 담당하고 Redux는 데이터를 핸들링하는데 이 복잡한 로직을 어디에 어떻게 넣고 관리하며 쉽게 핸들링 할 수 있을까.
이러한 요구 사항으로 나온것이 Redux-Saga이다. 비슷한 라이브러리로는 Redux-Thunk가 있으며 Saga가 Thunk보다 아주 조금 더 러닝 커브가 존재한다. 사실상의 두 개 모두 Redux의 미들웨어로서 같은 역활을 하지만 Redux-Saga에서만 가지고 있는 개념이 있다. 제너레이터와 이펙트 이다. (제너레이터는 Javascript에 포함된 기능이지만 Saga에서는 이를 적극 활용한다. 제너레이터의 개념을 모르면 Saga를 이해못한 것이나 다름없다.) 우선 Saga라는 용어에 대한 정의부터 살펴보겠다.
## Saga Pattern
Saga란 분산된 트랜잭션을 처리하는 패턴으로서 [1987년에 최초로 언급되었다.](https://www.cs.cornell.edu/andru/cs711/2002fa/reading/sagas.pdf) 현재는 MSA(Microservice Architectural)에서 여러개의 서비스 트랜잭션을 핸들링하는데 사용되는 패턴이다.
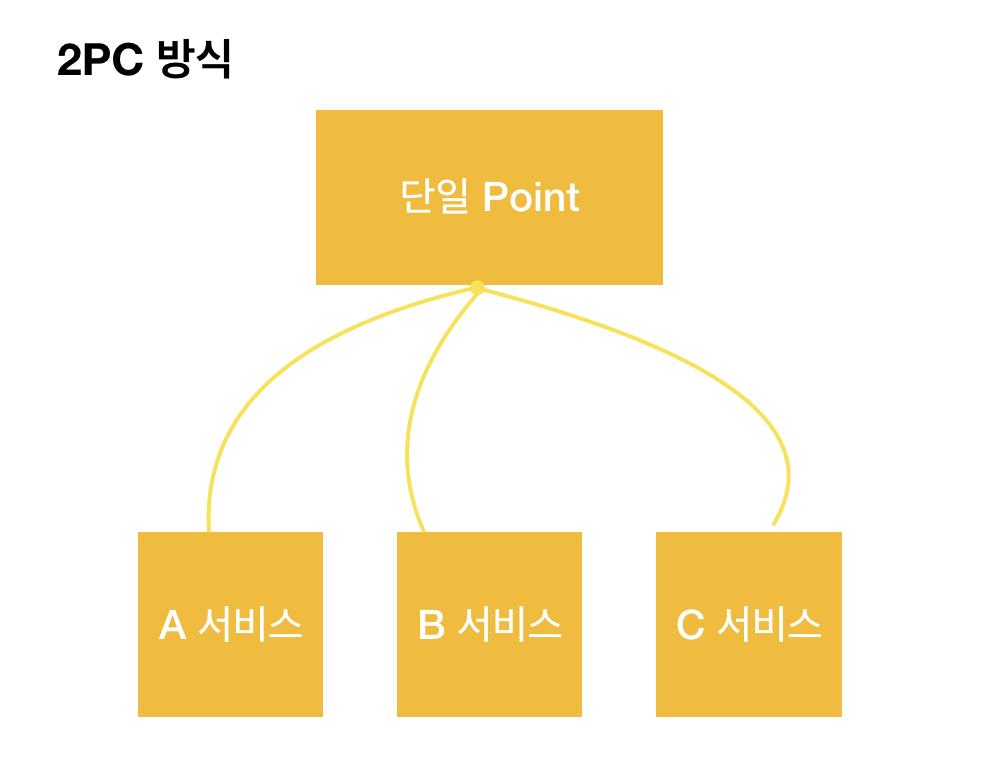
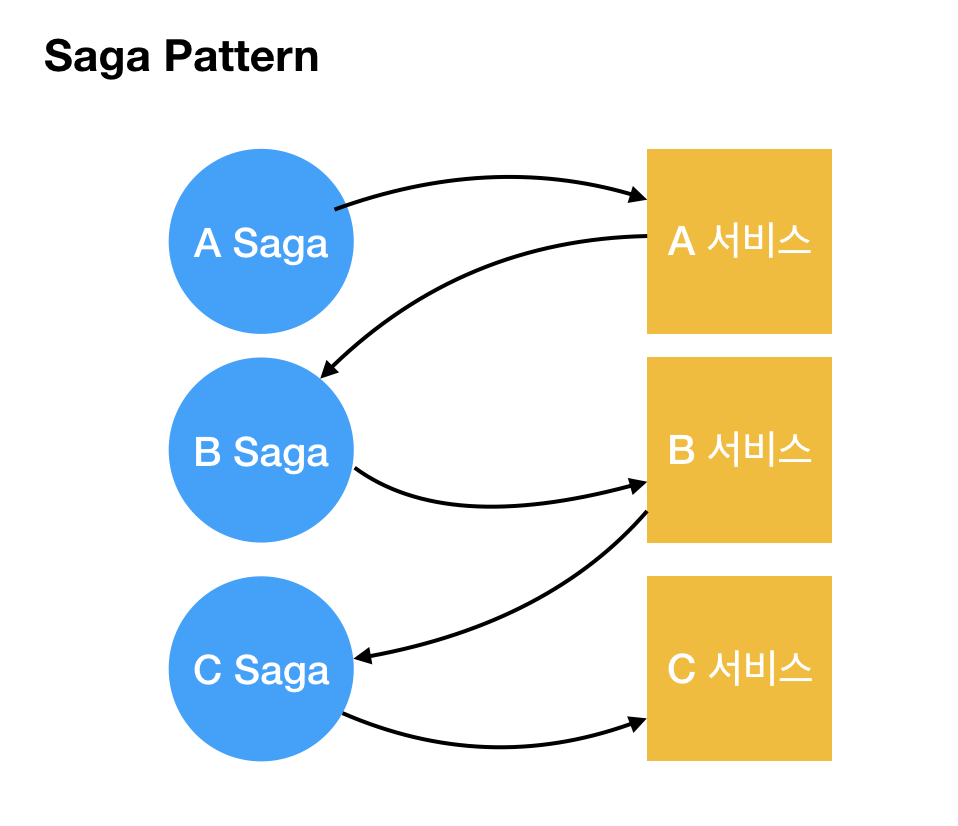
단일 포인트 지점에서 [ACID 트랜잭션](https://en.wikipedia.org/wiki/ACID)을 처리하는 **2PC (Twh-phase commit)**와는 다르게 각 서비스에 있는 saga는 개별 트랜잭션을 수행하며 이벤트를 발행한다. 다른 트랜잭션에는 해당 이벤트 리스너를 통해 이벤트를 받고 그 다음 트랜잭션을 처리한다.
Saga는 2가지 방식이 있다.
### Orchestraion-based Saga
Orchestrator가 실행해야할 트랜잭션을 알려줌
### Choreography-based Saga
각 서비스별로 이벤트를 실행하여 다른 트랜잭션을 트리거함
간단하게 말하면 Saga는 단계가 나뉘어진 이벤트들을 처리하고 에러 핸들링을 쉽게 할 수 있도록 설계된 패턴이다.
Saga에 관한 더 자세한 사항은 아래를 참고한다.
* [Pattern: Saga](https://microservices.io/patterns/data/saga.html)
* [Microservices : The SAGA Pattern for distributed transactions](https://medium.com/@ijayakantha/microservices-the-saga-pattern-for-distributed-transactions-c489d0ac0247)
* [Microservices and the Saga Pattern](https://blog.knoldus.com/microservices-and-the-saga-pattern/)
## Redux-Saga
Redux-Saga의 [공식문서](https://redux-saga.js.org/)에서는 Redux-Saga를 아래와 같이 정의하고 있다.
> redux-saga는 애플리케이션에서 일어나는 사이드 이펙트(side effects) (데이터를 불러오는 비동기 처리나 브라우저 캐쉬에 접근하는 행위들)을 쉽게 관리하며 효과적인 실행, 손쉬운 테스트 그리고 에러 핸들링을 쉽게 해준다. \
(원문) *redux-saga is a library that aims to make application side effects (i.e. asynchronous things like data fetching and impure things like accessing the browser cache) easier to manage, more efficient to execute, easy to test, and better at handling failures.*
여기서 말하는 사이드 이펙트란 외부에서 데이터를 받아와서 Store에 업데이트를 해주는 등의 작업을 말한다. 사이드 이펙트에 관한 설명은 [여기](https://uzihoon.com/post/4de52810-5201-11ea-a189-4bd78d8bfce2)서 좀 더 자세히 다루고 있다.
어플리케이션을 개발하다 보면 외부로 부터 데이터를 불러와서 결과값에 따라 다르게 보여 주거나 또는 기존 데이터랑 비교를 해서 업데이트 유무를 판단해야 하는 상황이 나타날 수 있다. 이럴때 Redux-Saga는 훌룡한 도구로서 동작한다. 물론 간단한 어플리케이션 개발에 있어서 Redux-Saga는 필수 조건이 아니다. 하지만 개인 블로그를 만들지 않는 이상 API를 활용한다면 Saga는 좋은 대안이 될 수 있을 것이다.
Redux-Saga를 자세히 들여다 보기 전에 관련된 개념을 먼저 살펴보도록 하겠다.
### 미들웨어
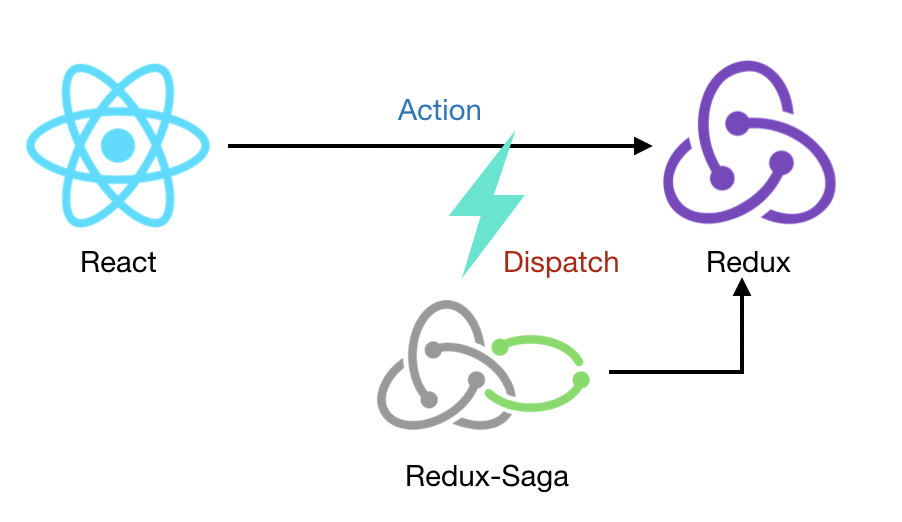
전통적인 의미에서의 미들웨어란 양 쪽을 연결하여 데이터를 주고받을 수 있도록 중간에서 매개 역활을 하는 것을 의미한다. Redux-Saga는 Redux의 미들웨어로서 전통적 의미와 유사한 역활을 수행한다. 잠시후 보겠지만 React에서는 Redux-Saga를 알지 못하며 알 필요도 없다. React는 Redux 액션을 수행하면 Redux-Saga에서 디스패치하여 Redux의 액션을 가로챈다. Proxy 같이 수행한다고 이해해도 괜찮다. 중간에 가로챈 액션의 역활을 수행 후 다시 액션을 발행하여 데이터를 저장하거나 다른 이벤트를 수행시킨다.
### 제너레이터
Saga는 제너레이터를 이용하여 모든 것을 수행한다. 그렇기 때문에 제너레이터를 이해하지 못하면 Saga를 이해못한 것이나 다름없다. 이 제너레이터 문법이 Redux-Saga의 러닝 커브를 올리는 요소가 아닐까 싶다. 그러나 제너레이터 문법은 Redux-Saga에서 만든 문법이 아닌 자바스크립트 ES6에 포함된 문법이다. 자바스크립트를 좀 더 잘 다루고 싶다면 필수로 이해해야하는 부분이 아닐까 싶다.
제너레이터는 방대한 개념을 포함하고 있기 때문에 [여기](https://uzihoon.com/post/f27b7310-64e0-11ea-84dc-878832775ccf)에서 따로 다루도록 하겠다.
### 이펙트
이펙트는 이벤트를 처리할 내용을 담고 있다. Redux-Saga에서는 이러한 이펙트 들을 `yield`를 이용하여 호출하고 수행된 내용을 다시 돌려 받아 그 다음 액션들을 수행한다. 결국 Redux-Saga는 제너레이터를 통해 이펙트를 수행하는 역활을 한다고 볼 수 있다. 대표적인 것들로는 `take`, `call`, `put` 등이 있다.
Redux-Saga는 아래와 같이 동작한다.
## Redux-Saga 설치 및 예제
Redux-Saga를 활용하기 위해선 React 와 Redux가 있어야 한다. `create-react-app`을 통해 React 기본 환경을 구성해주도록 하겠다.
``` shell
$ npx create-react-app saga-demo-app --template typescript
npx: 99개의 패키지를 3.677초만에 설치했습니다.
.
.
.
+ react-scripts@3.4.0
+ react@16.13.0
+ cra-template-typescript@1.0.2
+ react-dom@16.13.0
.
.
.
Success! Created saga-demo-app at /saga-demo-app
Inside that directory, you can run several commands:
npm start
Starts the development server.
npm run build
Bundles the app into static files for production.
npm test
Starts the test runner.
npm run eject
Removes this tool and copies build dependencies, configuration files
and scripts into the app directory. If you do this, you can’t go back!
We suggest that you begin by typing:
cd saga-demo-app
npm start
Happy hacking!
$ cd saga-demo-app
```
`create-react-app`으로 구성한 폴더 구조는 아래와 같다
``` shell
-rw-r--r-- 1 staff 2.1K 3 12 19:26 README.md
drwxr-xr-x 1025 staff 32K 3 12 19:27 node_modules
-rw-r--r-- 1 staff 586K 3 12 19:27 package-lock.json
-rw-r--r-- 1 staff 906B 3 12 19:27 package.json
drwxr-xr-x 8 staff 256B 3 12 19:26 public
drwxr-xr-x 11 staff 352B 3 12 19:27 src
-rw-r--r-- 1 staff 491B 3 12 19:27 tsconfig.json
```
`npm start`를 통해 로컬에서 확인할 수 있다.
``` shell
$ npm start
```
`localhost:3000`으로 접속하면 화면을 확인할 수 있다.
Redux, react와 redux를 연결해주는 react-redux, Redux 생성을 도와주는 typesafe-actions를 설치한다.
``` shell
$ npm i redux react-redux @types/react-redux typesafe-actions
.
.
.
+ redux@4.0.5
+ react-redux@7.2.0
+ @types/react-redux@7.1.7
+ typesafe-actions@5.1.0
added 7 packages from 22 contributors and audited 919231 packages in 12.038s
```
Redux-Saga를 설치한다.
``` shell
$ npm i redux-saga
.
.
.
+ redux-saga@1.1.3
added 10 packages from 6 contributors and audited 919250 packages in 17.664s
```
`src` 폴더 아래 불필요한 파일은 삭제하고 `Root.tsx` 파일을 생성한다. 작업 후 `src` 폴더 아래 파일들은 아래와 같다.
``` shell
-rw-r--r-- 1 staff 0B 3 12 21:12 Root.tsx
-rw-r--r-- 1 staff 452B 3 12 19:26 index.tsx
-rw-r--r-- 1 staff 40B 3 12 19:27 react-app-env.d.ts
-rw-r--r-- 1 staff 5.2K 3 12 19:26 serviceWorker.ts
-rw-r--r-- 1 staff 255B 3 12 19:26 setupTests.ts
```
`index.tsx`에서는 css와 App Component를 제거하고 Root Component를 불러온다
#### index.tsx
``` jsx
import React from "react";
import ReactDOM from "react-dom";
import * as serviceWorker from "./serviceWorker";
import Root from "./Root";
ReactDOM.render(, document.getElementById("root"));
// If you want your app to work offline and load faster, you can change
// unregister() to register() below. Note this comes with some pitfalls.
// Learn more about service workers: https://bit.ly/CRA-PWA
serviceWorker.unregister();
```
`src` 폴더 아래 `components`, `store`, `hooks` 폴더를 생성한다. 각 폴더의 역활은 아래와 같다.
``` shell
$ mkdir components store hooks
```
* **components** : View 담당하는 Component 폴더
* **store** : Redux 및 Redux-saga 폴더
* **hooks** : Custom Hook 폴더 나중에 Redux Store에 데이터를 가져오는 등의 역활 수행
`components` 폴더에 `App.tsx`를 생성하고 `Root.tsx`에 넣어준다.
#### Root.tsx
```jsx
import React from "react";
import App from "./components/App";
function Root() {
return ;
}
export default Root;
```
`components` 폴더 아래 `Counter.tsx`를 생성한다.
#### Counter.tsx
```jsx
import React from "react";
function Counter() {
return (
Counter
0
);
}
export default Counter;
```
`App.tsx`에서 Counter Component를 불러오면 아래와 같은 화면이 나온다.
#### App.tsx
```tsx
import React from "react";
import Counter from "./Counter";
function App() {
return ;
}
export default App;
```
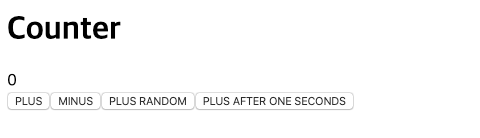
PLUS와 MINUS는 Redux 액션을 통해 처리 될 예정이며 각각 1을 더하거나 빼는 역활을 한다. PLUS RANDOM 과 PLUS AFTER ONE SECONDS는 Redux-Saga에서 처리할 이벤트 들이며 랜덤 값을 더하거나 1초 후에 값을 더하는 등의 역활을 수행한다.
이제 기본적인 폴더 구조와 화면은 준비되었으니 Redux와 Redux-Saga를 연결해보도록 하겠다.
먼저 Redux를 생성한다. store 아래 redux 폴더를 생성하고 counter.ts를 넣어준다.
#### counter.tsx
```typescript
import { createAction, ActionType, createReducer } from "typesafe-actions";
export interface IPlus {
num?: number;
}
// Actions
const PLUS = "counter/PLUS";
const MINUS = "counter/MINUS";
const PLUS_RANDOM = "counter/PLUS_RANDOM";
const PLUS_AFTER_ONE_SECONDS = "counter/PLUS_AFTER_ONE_SECONDS";
export const plus = createAction(PLUS)();
export const minus = createAction(MINUS)();
export const plusRandom = createAction(PLUS_RANDOM)();
export const plusAfterOneSeconds = createAction(PLUS_AFTER_ONE_SECONDS)();
// Types
export const actions = { plus, minus, plusRandom, plusAfterOneSeconds };
type CounterAction = ActionType;
type CounterState = {
count: number;
};
const initialState: CounterState = {
count: 0
};
// Reducer
const status = createReducer(initialState, {
[PLUS]: (state, action) => {
const { num } = action.payload;
const { count } = state;
const add = num || 1;
const _count = count + add;
return { count: _count };
},
[MINUS]: (state, action) => {
const { count } = state;
const _count = Math.max(count - 1, 0);
return { count: _count };
}
});
export default status;
```
Redux에 대해선 기본 개념이 있다 가정하고 설명은 생략하도록 하겠다.
이제 여러 reducer 들을 묶어주는 index 파일을 생성한다.
#### index.tsx
``` typescript
import counter from "./counter";
import { combineReducers } from "redux";
const rootReducer = combineReducers({ counter });
export default rootReducer;
export type RootState = ReturnType;
```
위 작업이 끝난다면 폴더 구조는 아래와 같다.
``` shell
├── node_modules
├── package-lock.json
├── package.json
├── public
│ ├── favicon.ico
│ ├── index.html
│ ├── logo192.png
│ ├── logo512.png
│ ├── manifest.json
│ └── robots.txt
├── src
│ ├── Root.tsx
│ ├── components
│ │ ├── App.tsx
│ │ └── Counter.tsx
│ ├── hooks
│ ├── index.tsx
│ ├── react-app-env.d.ts
│ ├── serviceWorker.ts
│ ├── setupTests.ts
│ └── store
│ └── redux
│ ├── counter.ts
│ └── index.ts
└── tsconfig.json
```
이제 오늘의 주인공 Redux-Saga를 생성 및 연결해 보도록 하겠다.
store 폴더 아래 saga 폴더를 생성하고 `index.ts`와 `counter.ts` 파일을 생성한다. `index.ts`에서는 Saga의 루트 파일로서 1개 이상의 Saga들을 묶어준다. `counter.ts`에서는 Saga 로직이 들어가는 파일로서 Redux의 파일명과 동일하게 가면 나중에 디버깅하기 수월하다. 우선 `counter.ts`에 위에서 말한 기능 2가지를 넣어보도록 하겠다.
#### counter.ts
``` typescript
/**
* plusRandom
* Counter Store에서 counter 값을 가져와 random 값을 더한 후 저장
*/
export function* plusRandom() {
try {
console.log("I catched action!")
} catch(error) {
console.error(error);
}
};
/**
* plusAfterOneSeconds
* 1초 후 plusRandom 액션 발행
*/
export function* plusAfterOneSeconds() {
try {
console.log("I catched action!");
} catch(error) {
console.error(error);
}
}
```
우선 세부 기능은 제외하고 2개의 saga를 만들었다. 그리고 saga가 실행되었을 때 `console`을 찍도록 구현하였다. 이제 `index.ts`에서 연결해 주도록 하겠다.
#### index.ts
``` typescript
// Saga
import * as CounterSaga from "./counter";
// Reducer
import * as CounterActions from "../redux/counter";
export default function* rootSaga() {
// Root Saga
}
```
Redux 액션을 Saga와 연결해주기 위해 두 파일을 임포트 하였고 root saga 함수를 만들어서 export 해주었다.
이제 Redux와 Redux-Saga를 연결할 Configure 함수를 생성하고, `Root.tsx`에 연결해 주겠다.
store/configure.tsx
``` typescript
import { createStore, applyMiddleware, compose } from "redux";
import createSagaMiddleware from "redux-saga";
import rootSaga from "./saga";
import rootReducer from "./redux";
declare global {
// tslint:disable-next-line: interface-name
interface Window {
__REDUX_DEVTOOLS_EXTENSION_COMPOSE__?: typeof compose;
}
}
const sagaMiddleware = createSagaMiddleware();
const isDev = process.env.NODE_ENV === "development";
const devTools = isDev && window.__REDUX_DEVTOOLS_EXTENSION_COMPOSE__;
const composeEnhancers = devTools || compose;
export default function configure() {
const store = createStore(
rootReducer,
{}, // pre-loaded state
composeEnhancers(applyMiddleware(sagaMiddleware))
);
sagaMiddleware.run(rootSaga);
return store;
}
```
`createSagaMiddleware`를 통해 store 생성할 때 `applyMiddleware`를 넣어 준다. 이 외에는 일반적으로 Redux store 생성이랑 동일하다.
### Root.tsx
``` jsx
import React from "react";
import { Provider } from "react-redux";
import configure from "./store/configure";
import App from "./components/App";
const store = configure();
function Root() {
return (
);
}
export default Root;
```
configure를 불러와 store 생성 후 React와 연결해준다.
자! 이로서 Redux-Saga를 사용할 준비를 끝마쳤다.
Redux 미들웨어로 Redux-Saga를 넣어주고 React와 연결해 줌으로써 React-Redux-Saga-Redux의 흐름이 가능하게 되었다.
이제 로직을 구현해보도록 하겠다.
Store에 저장된 값과 액션들을 수행하기 위해 먼저 Custom Hooks을 만들어 준다. hooks 폴더 아래 각각의 파일을 생성한다.
#### useCounterActions.tsx
``` jsx
import { useDispatch } from "react-redux";
import { useCallback } from "react";
import { actions, IPlus } from "../store/redux/counter";
export default function useCounterActions() {
const dispatch = useDispatch();
const onPlus = useCallback((param: IPlus) => dispatch(actions.plus(param)), [
dispatch
]);
const onMinus = useCallback(() => dispatch(actions.minus()), [dispatch]);
const onPlusRandom = useCallback(() => dispatch(actions.plusRandom()), [
dispatch
]);
const onPlusAfterOneSeconds = useCallback(
() => dispatch(actions.plusAfterOneSeconds()),
[dispatch]
);
return { onPlus, onMinus, onPlusRandom, onPlusAfterOneSeconds };
}
```
#### useCounter.ts
``` typescript
import { useSelector } from "react-redux";
import { RootState } from "../store/redux";
export default function useCounter() {
const counter = useSelector((state: RootState) => state.counter);
return counter;
}
```
이제 Counter Component에서 데이터와 액션들을 가져와 연결시켜준다.
#### Counter.tsx
``` jsx
import React from "react";
import useCounterActions from "../hooks/useCounterActions";
import useCounter from "../hooks/useCounter";
function Counter() {
const counterActions = useCounterActions();
const count = useCounter().count;
return (
Counter
{count}
);
}
export default Counter;
```
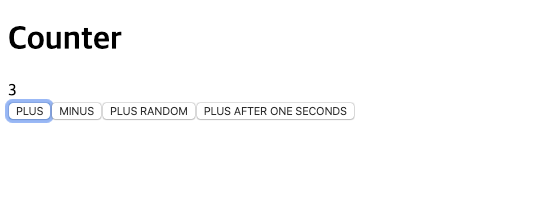
미리 구현된 Plus 와 Minus의 기능을 테스트 해보면 정상적으로 동작하는 것을 알 수 있다.
이제 Saga를 연결 해 보겠다
Redux-Saga에 내장되어있는 이펙트들은 매우 다양한데 그 중에서 `takeEvery`, `takeLatest` 이펙트를 사용하면 Redux 액션을 Saga와 연결 시켜 줄 수 있다.
```jsx
import { takeEvery } from "redux-saga/effects";
// Saga
import * as CounterSaga from "./counter";
// Reducer
import * as CounterActions from "../redux/counter";
export default function* rootSaga() {
// Root Saga
yield takeEvery(
CounterActions.plusAfterOneSeconds,
CounterSaga.plusAfterOneSeconds
);
}
```
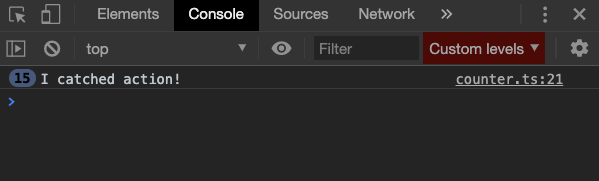
`takeEvery`는 액션이 발생될 때마다 수행되며 `takeLatest`는 마지막으로 발생된 액션만 수행한다. 보통은 `takeEvery`를 통해 Redux와 연결 시켜준다. 저장하고 화면에서 PLUS AFTER ONE SECONDS 버튼을 눌러보면 아래와 같이 콘솔창에 찍힌 것을 알 수 있다.
`fork` 이펙트는 함수를 실행 시켜 주며 여러개를 동시에 하고싶을 경우 `all`을 활용하면 된다.
처리해야할 saga들이 많아 질 경우 rootSaga에 전부 관리하기 불편하므로 각 Reducer마다 핸들링 하는 함수를 만들어 Root에서 불러오는 것이 관리하기 편리하다.
### index.ts
``` typescript
import { takeEvery, all, fork } from "redux-saga/effects";
// Saga
import * as CounterSaga from "./counter";
// Reducer
import * as CounterActions from "../redux/counter";
export default function* rootSaga() {
// Root Saga
yield all([fork(handleCounter)]);
}
function* handleCounter() {
yield takeEvery(
CounterActions.plusAfterOneSeconds,
CounterSaga.plusAfterOneSeconds
);
yield takeEvery(CounterActions.plusRandom, CounterSaga.plusRandom);
}
```
이제 Saga 내부 로직을 구현해 보겠다.
``` jsx
import { put, delay } from "redux-saga/effects";
import * as CounterActions from "../redux/counter";
function getRandomInt(min: number, max: number) {
min = Math.ceil(min);
max = Math.floor(max);
return Math.floor(Math.random() * (max - min + 1)) + min;
}
/**
* plusRandom
* Counter Store에서 counter 값을 가져와 random 값을 더한 후 저장
*/
export function* plusRandom() {
try {
const num = getRandomInt(1, 20);
yield put(CounterActions.plus({ num }));
} catch (error) {
console.error(error);
}
}
/**
* plusAfterOneSeconds
* 1초 후 plusRandom 액션 발행
*/
export function* plusAfterOneSeconds() {
try {
yield delay(1000);
yield put(CounterActions.plusRandom())
} catch (error) {
console.error(error);
}
}
```
`put` 이펙트는 Redux 액션을 실행하도록 도와준다. Saga에서 내부 작업이 끝나고 다시 Redux에 데이터를 저장하거나 액션을 수행해야 할 경우 `put`이펙트를 실행한다. `delay`는 주어진 값만큼이 지나고 난 후 다음 작업을 수행하도록 한다. 제너레이터를 사용하므로 가능한 동작들이다. 내부 로직은 간단하다. plusRandom은 랜덤 값을 생성 후 다시 plus 액션을 실행하였고 plusAfterOneSeconds는 1초가 끝난 후 다시 plusRandom 액션을 실행하였다.
이후 나머지 두 개의 버튼을 눌러보면 의도한 대로 잘 동작하는 것을 알 수 있다.
Saga 구현은 이것으로 끝이다. 한번에 이해가 안되더라도 직접 사용하다 보면 어떤식으로 흘러가는지 이해할 수 있을꺼라 생각된다. Redux-Saga는 위에 말한 대로 다양한 이펙트를 활용하여 여러 디자인 패턴을 만들어 낼 수 있다. 이 외에도 `channel`, `race` 등 재밌고 유용한 이펙트들이 많다. 직접 사용하다 막히는 부분이 있으면 공식 문서를 참조하여 다양한 이펙트들을 사용해 보길 권한다.
다음 포스팅 에서는 Redux-Saga를 통해 interval 처리 하는 법과 더 다양한 이펙트들을 다루는 법을 알아보도록 하겠다.
본 문서에서 사용된 코드들은 [Github](https://github.com/Uzihoon/saga-demo-app)에서 확인이 가능하다.