> 이글은 Jenkins X 를 이용하여 Static Jenkins를 설치하는 법을 다룹니다. Jenkins X에 대한 자세한 설명과 활용법은 [이곳](/post/eabb9930-5f8a-11ea-8839-c791ea9b277c)을 참고하세요.

## Jenkins X 란?
Jenkins X는 Jenkins를 활용한 CI/CD 오픈소스 로서 쿠버네티스를 활용하여 클라우드 환경에서 자동화된 CI/CD 개발환경 설정을 손쉽게 해주는 서비스이다. 기존 Jenkins와는 구조적으로 아예 다르게 설계되었다. Jenkins X의 자세한 구조 설명은 [이곳](/post/eabb9930-5f8a-11ea-8839-c791ea9b277c)에서 설명한다. Amazon, Azure, Google, IBM Cloud, OpenShift 등 대부분의 클라우드 환경을 지원하며 무엇보다 쉽게 설치해서 사용할 수 있다는 점을 강조하고 있다.
Jenkins X는 `jx`를 활용하여 설치 및 로그 확인 등 모든 명령어를 다루고 있으며 Jenkins X를 설치할 경우 jenkins 및 chartmuseum, nexus 등이 Helm Chart로 만들어져 설치된다. 로컬에 있는 소스 코드를 import해서 jenkins와 연동 해도 되지만, jx quickstart를 사용할 경우 docker 셋팅등이 되어 있어 쉽게 연동해서 사용할 수 있다.
## Jenkins X 환경 설정
**실행환경**
> Cloud: `AWS EC2`
AMI: `t2.micro`
Region: `ap-northeast-2`
먼저 AWS 계정 설정을 해준다.
``` shell
$ aws configure
AWS Access Key ID [None]: YOUR_ACCESS_KEY_ID
AWS Secret Access Key [None]: YOUR_SECRET_ACCESS_KEY
Default region name [None]: YOUR_REGION
```
여기서 region은 seoul이기 때문에 ap-northeast-2로 설정해줬다.
AWS Linux에서는 git이 기본으로 설치되어 있지 않기 때문에 git을 추가로 설치해 줘야 한다.
``` shell
$ sudo yum install git
```
`kubectl` 설치
``` shell
$ curl -LO https://storage.googleapis.com/kubernetes-release/release/`curl -s https://storage.googleapis.com/kubernetes-release/release/stable.txt`/bin/linux/amd64/kubectl
$ chmod +x ./kubectl
$ sudo mv ./kubectl /usr/local/bin/kubectl
```
``` shell
$ kubectl version
Client Version: version.Info{Major:"1", Minor:"17", GitVersion:"v1.17.2", GitCommit:"59603c6e503c87169aea6106f57b9f242f64df89", GitTreeState:"clean", BuildDate:"2020-01-18T23:30:10Z", GoVersion:"go1.13.5", Compiler:"gc", Platform:"linux/amd64"}
```
`EKS` 설치를 위해 AWS 계정을 export 해준다.
``` shell
$ export AWS_ACCESS_KEY_ID=$(aws configure get aws_acces_key_id)
$ export AWS_SECRET_ACCESS_KEY=$(aws configure get aws_secret_access_key)
```
`jx`를 설치 해 준다.
``` shell
$ curl -L "https://github.com/jenkins-x/jx/releases/download/$(curl --silent "https://github.com/jenkins-x/jx/releases/latest" | sed 's#.*tag/\(.*\)\".*#\1#')/jx-linux-amd64.tar.gz" | tar xzv "jx"
$ sudo mv jx /usr/local/bin
```
`jx` 버전은 추후 EKS 설치 후 아래와 같이 확인이 가능하다.
``` shell
$ jx version
NAME VERSION
jx 2.0.1177
Kubernetes cluster v1.14.9-eks-c0eccc
kubectl v1.14.7-eks-1861c5
git 2.17.2
```
`jx`는 `eksctl`를 통해 EKS를 설치하기 때문에 `eksctl`이 추가로 설치가 필요하다
``` shell
$ curl --silent --location "https://github.com/weaveworks/eksctl/releases/download/latest_release/eksctl_$(uname -s)_amd64.tar.gz" | tar xz -C /tmp
$ sudo mv /tmp/eksctl /usr/local/bin
```
``` shell
$ eksctl version
[ℹ] version.Info{BuiltAt:"", GitCommit:"", GitTag:"0.13.0"}
```
`jx` 및 `eksctl`이 설치가 완료되었으면, `jx`를 통해 EKS를 생성한다.
``` shell
$ jx create cluster eks --cluster-name=YOUR_CLUSTER_NAME --skip-installation=true
```
의존성 파일 설치는 helm으로 선택한다.
``` shell
? Missing required dependencies, deselect to avoid auto installing: helm
Installing helm
```
EKS 설치에 시간이 약간 소요 된다.
``` shell
[ℹ] eksctl version 0.13.0
[ℹ] using region ap-northeast-2
[ℹ] setting availability zones to [ap-northeast-2a ap-northeast-2c ap-northeast-2b]
.
.
.
[ℹ] kubectl command should work with "/root/.kube/config", try 'kubectl get nodes'
[✔] EKS cluster "jenkins-jx" in "ap-northeast-2" region is ready
Initialising cluster ...
aks cluster created. Skipping Jenkins X installation.
```
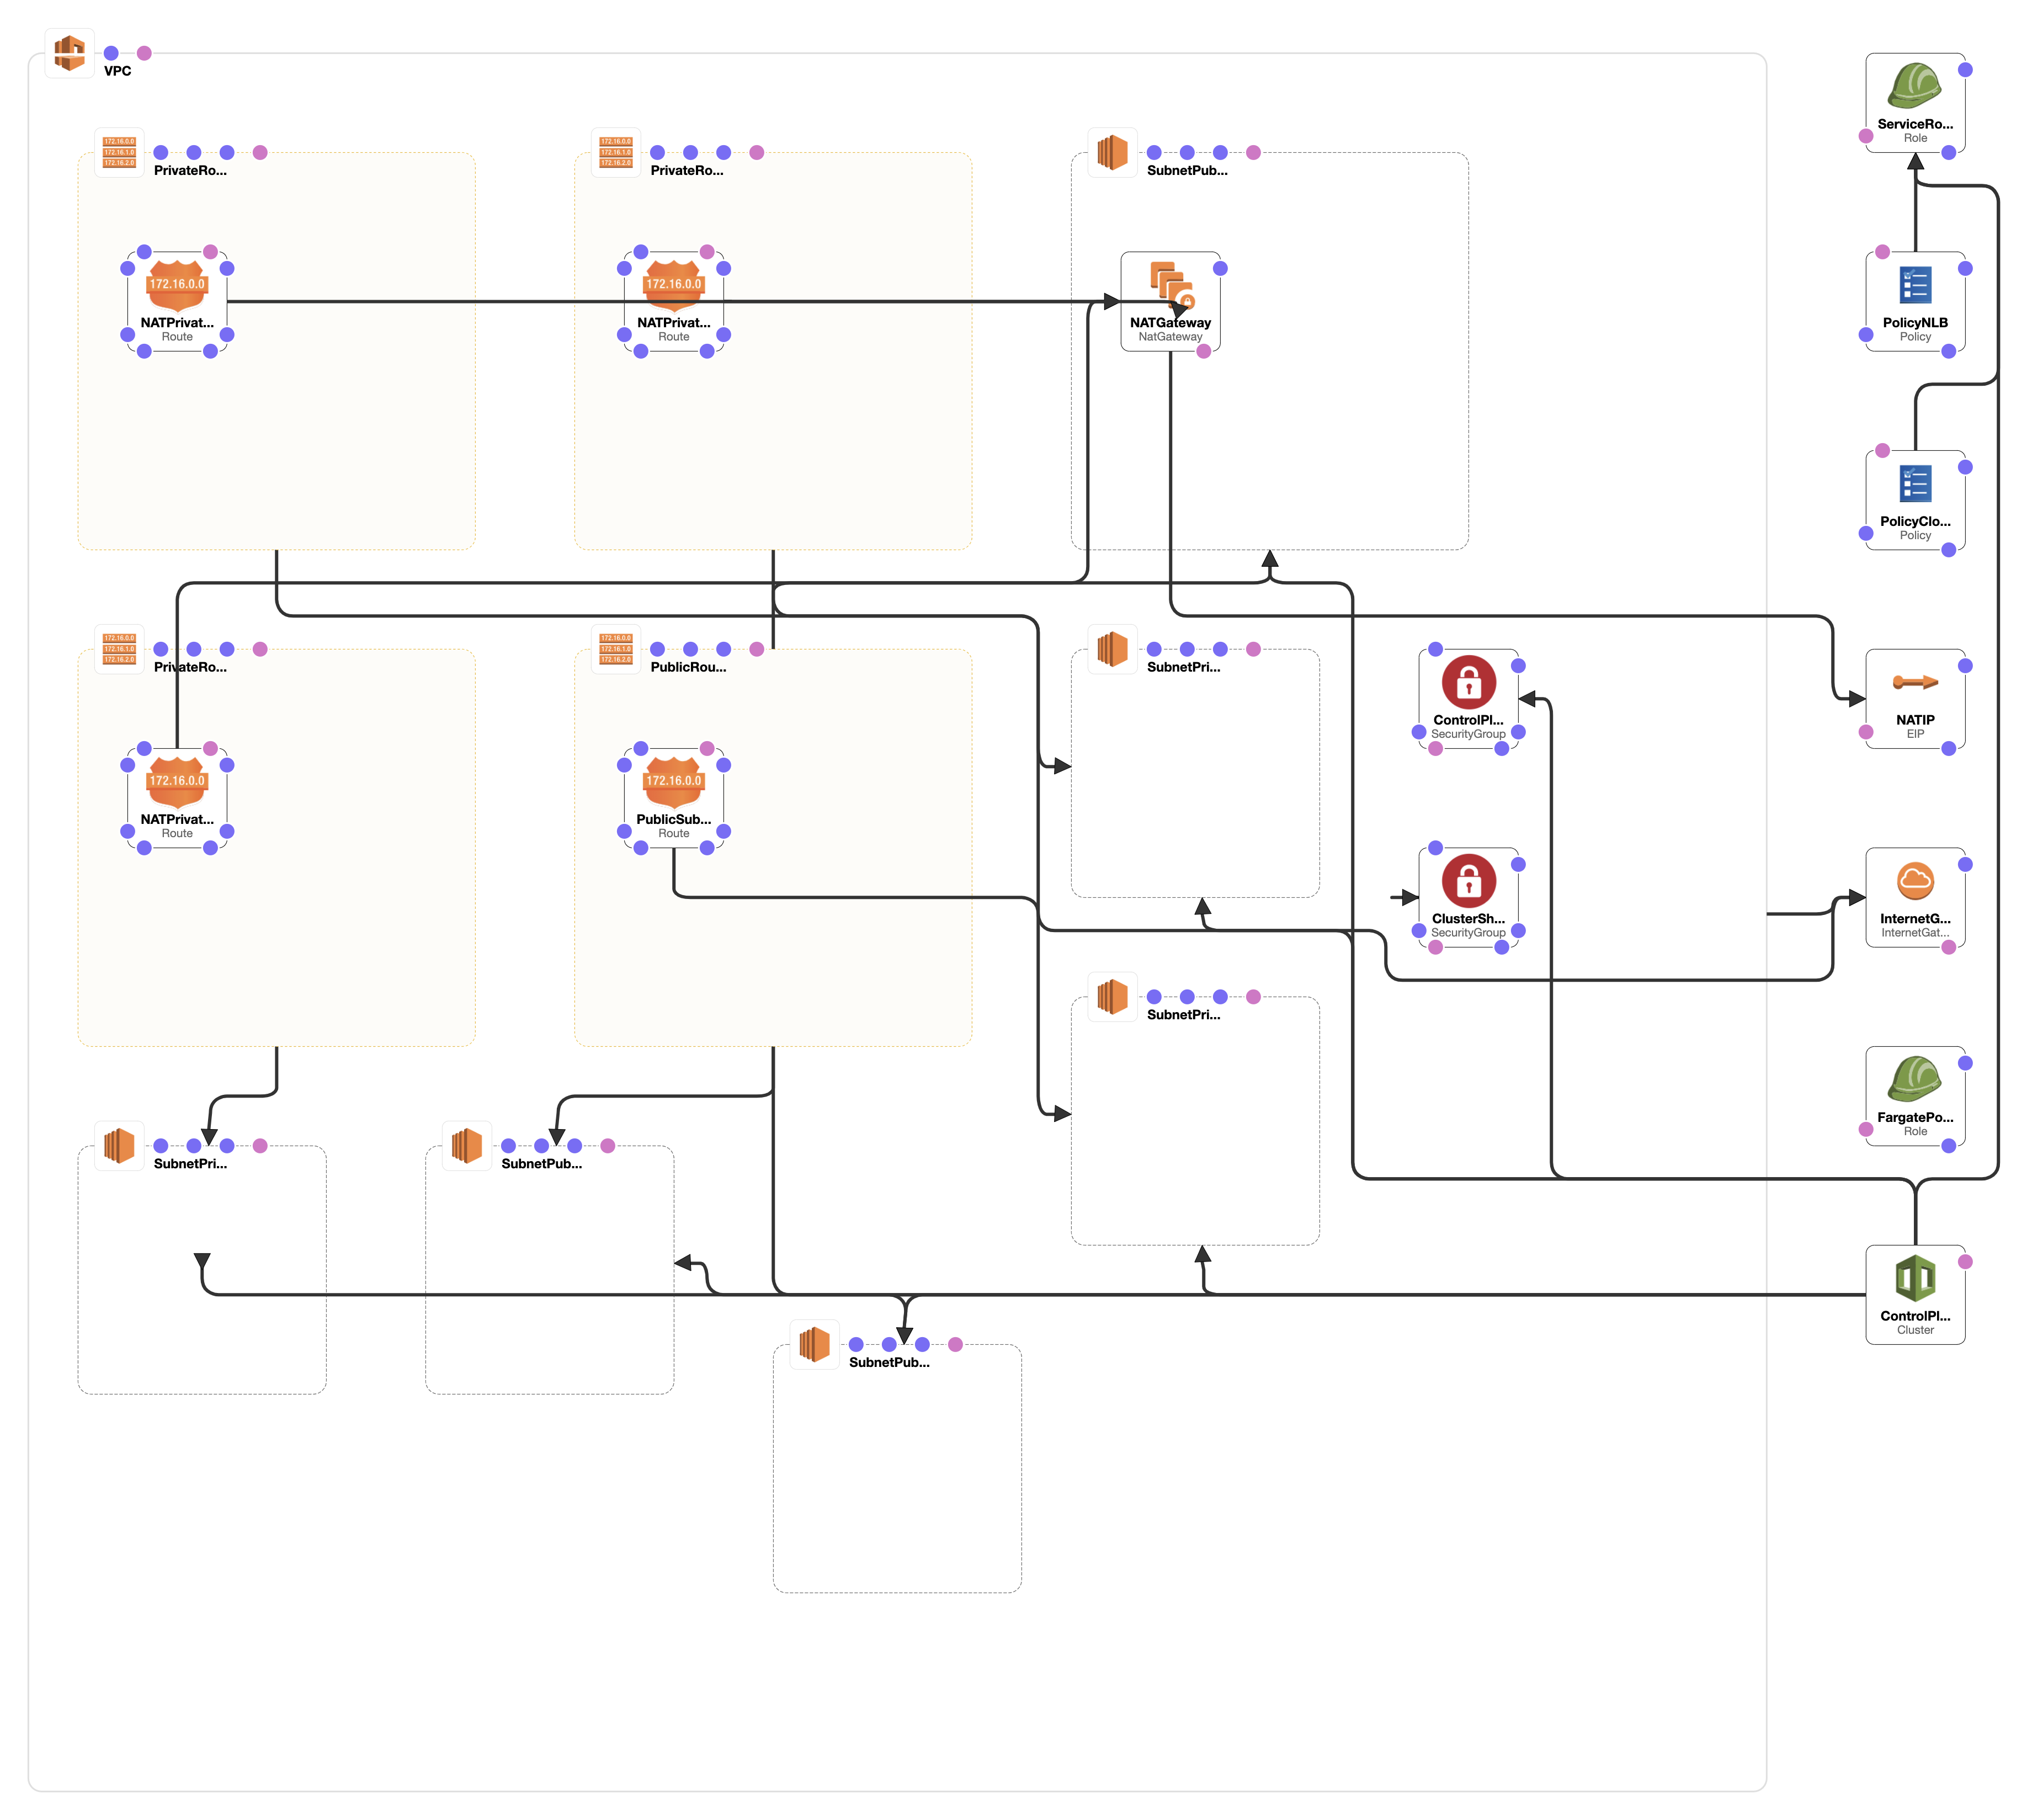
`eksctl`로 설치되기 때문에 AWS CloudFormation에서 설치 과정을 확인 할 수 있다.
최종 설치는 아래와 같다
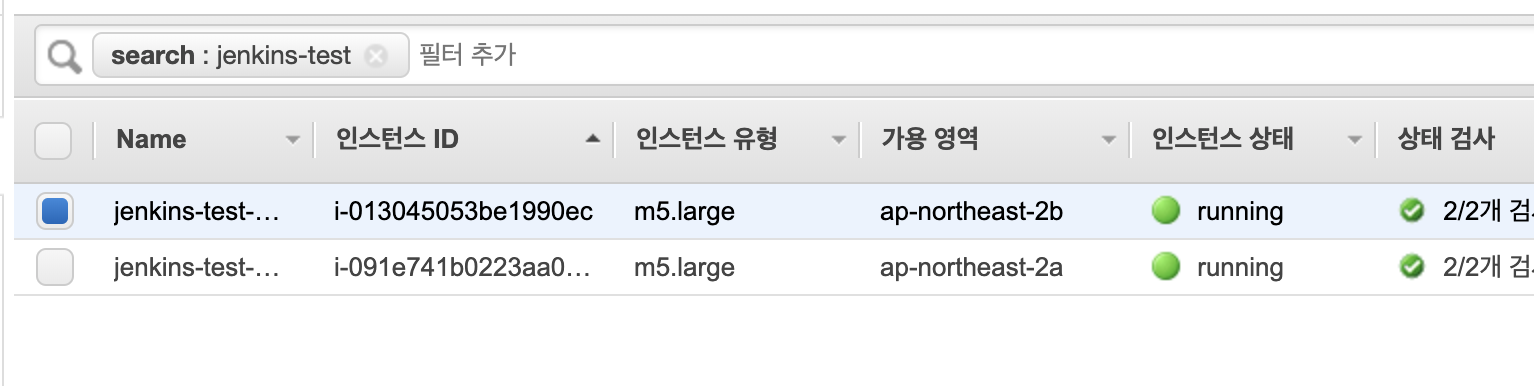
설치가 완료되었다면 EC2가 2개 생성된것을 확인 할 수있다.
local에서 kubectl을 통해 EKS를 설정하기 위해선 [aws-iam-authenticator 설정](https://uzihoon.com/post/3bcf2ad0-488e-11ea-85e1-4d3ea54c1b82)이 필요하다
EKS설치 후 jx를 통해 Jenkins X를 설치 해 준다.
``` shell
$ jx install --provider=eks --default-environment-prefix=jenkins-test
```
`--provier` 로 Cloud를 설정할 수 있으며 여기선 EKS로 설정해준다.
``` shell
? Select Jenkins installation type: [Use arrows to move, space to select, type to filter]
Serverless Jenkins X Pipelines with Tekton
> Static Jenkins Server and Jenkinsfiles
```
첫번째로 Jenkins를 Serverless 로 설치할 것인지 Static Server로 설치할지 선택하는데 여기선 Static Server로 선택하겠다.
다음으로 git 에 사용할 이름을 설정한다 만약 git이 미리 설정되어있다면 자동으로 설정된다.
``` shell
Namespace jx created
Context "iam-root-account@jenkins-test.ap-northeast-2.eksctl.io" modified.
? Please enter the name you wish to use with git: YOUR_GIT_NAME
? Please enter the email address you wish to use with git: YOUR_GIT_EMAIL
```
Helm으로 설정 파일들이 설치되고 DNS 이름 설정부분은 n를 선택한다.
``` shell
On AWS we recommend using a custom DNS name to access services in your Kubernetes cluster to ensure you can use all of your Availability Zones
If you do not have a custom DNS name you can use yet, then you can register a new one here: https://console.aws.amazon.com/route53/home?#DomainRegistration:
? Would you like to register a wildcard DNS ALIAS to point at this ELB address? [? for help] (Y/n) n
```
n을 선택하면 IP Address를 DNS 로 사용할껀지 물어보는데 여기서 Y를 선택한다
``` shell
? Would you like wait and resolve this address to an IP address and use it for the domain? [? for help] (Y/n) Y
```
Jenkins X 에서 nip.io를 통해 ip Address 를 자동으로 설정해주는데 여기서 그냥 넘어가게 되면 EC2 ip가 도메인이 된다.
``` shell
If you do not have a custom domain setup yet, Ingress rules will be set for magic DNS nip.io.
Once you have a custom domain ready, you can update with the command jx upgrade ingress --cluster
? Domain [? for help] (15.165.182.166.nip.io)
```
만약 Domain을 가지고 있다면 jx install 부분에서 설정을 할 수도 있다.
``` shell
$ jx install --provider=eks --domain=YOUR_DOMAIN --default-environment-prefix=YOUR_EKS_NAME
```
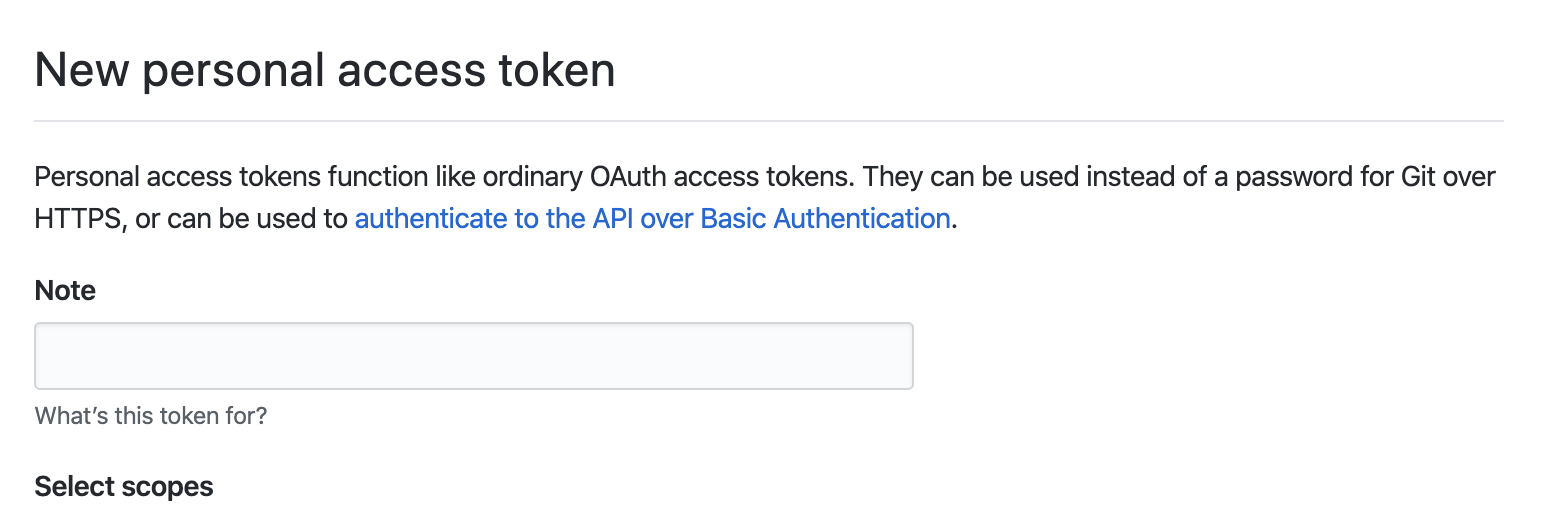
그 다음 Github webhook을 사용하기 위한 github 사용자 이름을 물어보고 API Token 설정을 2번 해줘야 하는데 Please click this URL and generate a token 아래에 있는 url로 들어가 생성된 Token을 입력해 주면 된다.
``` shell
Set up a Git username and API token to be able to perform CI/CD
Creating a local Git user for github.com server
? github.com username: YOUR_GITHUB_NAME
To be able to create a repository on github.com we need an API Token
Please click this URL and generate a token
```
Git Server로 Github을 설정해준다.
``` shell
Select the CI/CD pipelines Git server and user
? Do you wish to use github.com as the pipelines Git server: (Y/n) Y
```
위 설정들을 다 마치고 나면 관련 image들을 다운 받는다
``` shell
Installing jx into namespace jx
Installing jenkins-x-platform version: 2.0.1967
WARNING: waiting for install to be ready, if this is the first time then it will take a while to download images
```
몇가지 설정을 완료하면 설치가 완료된다.
``` shell
? Select the organization where you want to create the environment repository: [Use arrows to move, space to select, type to filter]
> YOUR_REPOSITORY
```
설치가 완료되면 아래와 같이 Jenkins Admin password와 함께 설치가 완료되었다고 뜬다
``` shell
Triggered Jenkins job: http://jenkins.jx.15.165.182.166.nip.io/job/Uzihoon/job/environment-jenkins-production/
Creating GitHub webhook for Uzihoon/environment-jenkins-production for url http://jenkins.jx.15.165.182.166.nip.io/github-webhook/
Jenkins X installation completed successfully
********************************************************
NOTE: Your admin password is: W7C5qwB3eo7cG^-jQmtX
********************************************************
Your Kubernetes context is now set to the namespace: jx
To switch back to your original namespace use: jx namespace default
Or to use this context/namespace in just one terminal use: jx shell
For help on switching contexts see: https://jenkins-x.io/developing/kube-context/
To import existing projects into Jenkins X: jx import
To create a new Spring Boot microservice: jx create spring -d web -d actuator
To create a new microservice from a quickstart: jx create quickstart
```
만약 password를 까먹었거나 해당 화면을 지나쳤다면, 아래와 같은 경로에서 비밀번호를 확인 할 수 있다.
``` shell
$ cat /root/.jx/adminSecrets.yaml
```
`kubectl`로 설치된 pod들을 확인 할 수 있다.
```
$ kubectl get all
```
``` shell
NAME READY STATUS RESTARTS AGE
pod/jenkins-569849fff4-smfj2 1/1 Running 0 3m34s
pod/jenkins-x-chartmuseum-d87cbb789-g4gz2 1/1 Running 0 3m35s
pod/jenkins-x-controllerrole-6d68696785-r46gv 1/1 Running 0 3m35s
pod/jenkins-x-heapster-75558b6cfb-4klr9 2/2 Running 0 3m23s
pod/jenkins-x-nexus-8b8dfd746-v6h27 1/1 Running 0 3m34s
pod/maven-32rfs 0/2 ContainerCreating 0 10s
pod/maven-csqz1 0/2 ContainerCreating 0 10s
NAME TYPE CLUSTER-IP EXTERNAL-IP PORT(S) AGE
service/heapster ClusterIP 10.100.169.194 8082/TCP 3m35s
service/jenkins ClusterIP 10.100.232.252 8080/TCP 3m35s
service/jenkins-agent ClusterIP 10.100.255.98 50000/TCP 3m35s
service/jenkins-x-chartmuseum ClusterIP 10.100.30.150 8080/TCP 3m35s
service/nexus ClusterIP 10.100.13.160 80/TCP 3m34s
NAME READY UP-TO-DATE AVAILABLE AGE
deployment.apps/jenkins 1/1 1 1 3m35s
deployment.apps/jenkins-x-chartmuseum 1/1 1 1 3m35s
deployment.apps/jenkins-x-controllerrole 1/1 1 1 3m35s
deployment.apps/jenkins-x-heapster 1/1 1 1 3m35s
deployment.apps/jenkins-x-nexus 1/1 1 1 3m34s
NAME DESIRED CURRENT READY AGE
replicaset.apps/jenkins-569849fff4 1 1 1 3m35s
replicaset.apps/jenkins-x-chartmuseum-d87cbb789 1 1 1 3m35s
replicaset.apps/jenkins-x-controllerrole-6d68696785 1 1 1 3m35s
replicaset.apps/jenkins-x-heapster-6457df4bd8 0 0 0 3m35s
replicaset.apps/jenkins-x-heapster-75558b6cfb 1 1 1 3m23s
replicaset.apps/jenkins-x-nexus-8b8dfd746 1 1 1 3m34s
NAME SCHEDULE SUSPEND ACTIVE LAST SCHEDULE AGE
cronjob.batch/jenkins-x-gcactivities 0/30 */3 * * * False 0 3m35s
cronjob.batch/jenkins-x-gcpods 0/30 */3 * * * False 0 3m35s
cronjob.batch/jenkins-x-gcpreviews 0 */3 * * * False 0 3m35s
NAME GIT URL STATUS
pipelineactivity.jenkins.io/uzihoon-environment-jenkins-test-production-master-1 Running
pipelineactivity.jenkins.io/uzihoon-environment-jenkins-test-staging-master-1 Running
NAME NAME VERSION GIT URL
release.jenkins.io/controllerrole-2.0.1177 controllerrole 2.0.1177 https://github.com/jenkins-x/jx
release.jenkins.io/gcactivities-2.0.1177 gcactivities 2.0.1177 https://github.com/jenkins-x/jx
release.jenkins.io/gcpods-2.0.1177 gcpods 2.0.1177 https://github.com/jenkins-x/jx
release.jenkins.io/gcpreviews-2.0.1177 gcpreviews 2.0.1177 https://github.com/jenkins-x/jx
```
`jx open` 으로 올라온 서비스들의 url을 확인 할 수 있다.
``` shell
$ jx open
NAME URL
jenkins http://jenkins.jx.15.165.182.166.nip.io
jenkins-x-chartmuseum http://chartmuseum.jx.15.165.182.166.nip.io
nexus http://nexus.jx.15.165.182.166.nip.io
```
Jenkins URL로 접속하면 아래와 같이 로그인 창이 나온다.

ID 는 admin 이며 비밀번호는 설치 완료 후 보여준 비밀번호를 통해 들어간다.
들어가면 익숙한 Jenkins 화면이 뜨고, 미리 Github에 설치된 private 프로젝트들을 빌드 돌리고 있다.

`eksctl` 명령을 통해 EKS를 날리면 Jenkins X도 같이 삭제된다.
``` shell
eksctl delete cluster --name YOUR_EKS_NAME
```